Find
Using Results
The Results panel displays the output from using the Identify
tool, from a search using Find, or from other operations that
output information.
To open the Results window
- Results panel expands automatically after performing a
search
or after you choose the option to add features found
with the Identify tool
to the Results panel.
- You can also expand Results by clicking its down-arrow
in the
Console. If you open
Results before doing any search or Identify, the Results
panel will be blank.
- You can collapse
the Results panel to its title bar by clicking the
collapse icon.
- You can resize the height of Results
by clicking and dragging the bottom of the
Results section.
- If Results is re-opened, previous results will
still be visible, along with any new ones
just found.
Navigating the Results window
- After doing a search or adding results from Identify, an item will be added to Results.
- If you do another search or add another result from Identify, the new results items
are added to the top of the list in Results.
Previous items remain in the list.
- To see information associated with a Location or Find result,
click the plus icon
 to the left of the item.
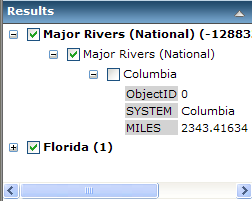
- When you expand a results item, you will see
one or more layer names. Expand a layer to see
the features found within that layer at the location.
Features are listed using the value of
the first string field in the attributes.
- To see details for a feature, click its plus icon
 .
This displays attribute field names and values
for the feature. .
This displays attribute field names and values
for the feature.
- Right-click on an item in Results for options such as Zoom To, Zoom to selected features, Pan to, Rerun task, or Remove. Available options vary depending on the nature of the result.
|

|
Interacting with results items and map graphics
You can hover over features in the Results, and the corresponding graphic on the
map will change color temporarily. This allows you to quickly determine the location
of features listed in the Results window.
You can hover over a graphic for a feature on the map and the feature will temporarily
change color. A label, if available, will also be temporarily displayed for the
feature. You can then click on the graphic or the label and the label will expand
to display all available attributes for the feature. You may scroll through the
list of attributes. When you move the cursor away from the graphic, label or box,
these items will be hidden. This allows you to easily explore the features highlighted
on the map.
Selecting with the Results window
Features may be selected (highlighted) on the map by clicking
the check-box next to feature
names:
 . Most tasks select features when they are added to the Results. By default the highlighting
has a cyan (blue-green) outline or fill, but this may be set to a different color
by the creator of the map service. To unselect features uncheck them in the
Results window. You can unselect an entire layer or result set by unchecking its
check-box in the Results window.
Zooming to Features
You can zoom to one or more features in the Results window. See
the table above for illustrations of the right-click menus.
- To zoom to a single feature, right-click the feature's name
(next to the plus icon), and in the pop-up menu, choose Zoom to.
- To zoom to multiple features in a layer, click in the checkboxes
of the features, then right-click on the Layer name, and choose
Zoom To Selected Features.
 to the left of the item.
 .
This displays attribute field names and values
for the feature.
 . Most tasks select features when they are added to the Results. By default the highlighting
has a cyan (blue-green) outline or fill, but this may be set to a different color
by the creator of the map service. To unselect features uncheck them in the
Results window. You can unselect an entire layer or result set by unchecking its
check-box in the Results window.